
Basic Kit 2 Getting Started Guide
Set up with your favorite AI
 ChatGPT
  Claude
 Gemini & other AI
Copy the setup prompt into your AI. Work through each step together, from checking your kit to getting it running.
 Open Gemini
 Copy the prompt, then paste it into Gemini’s message box.
View prompt
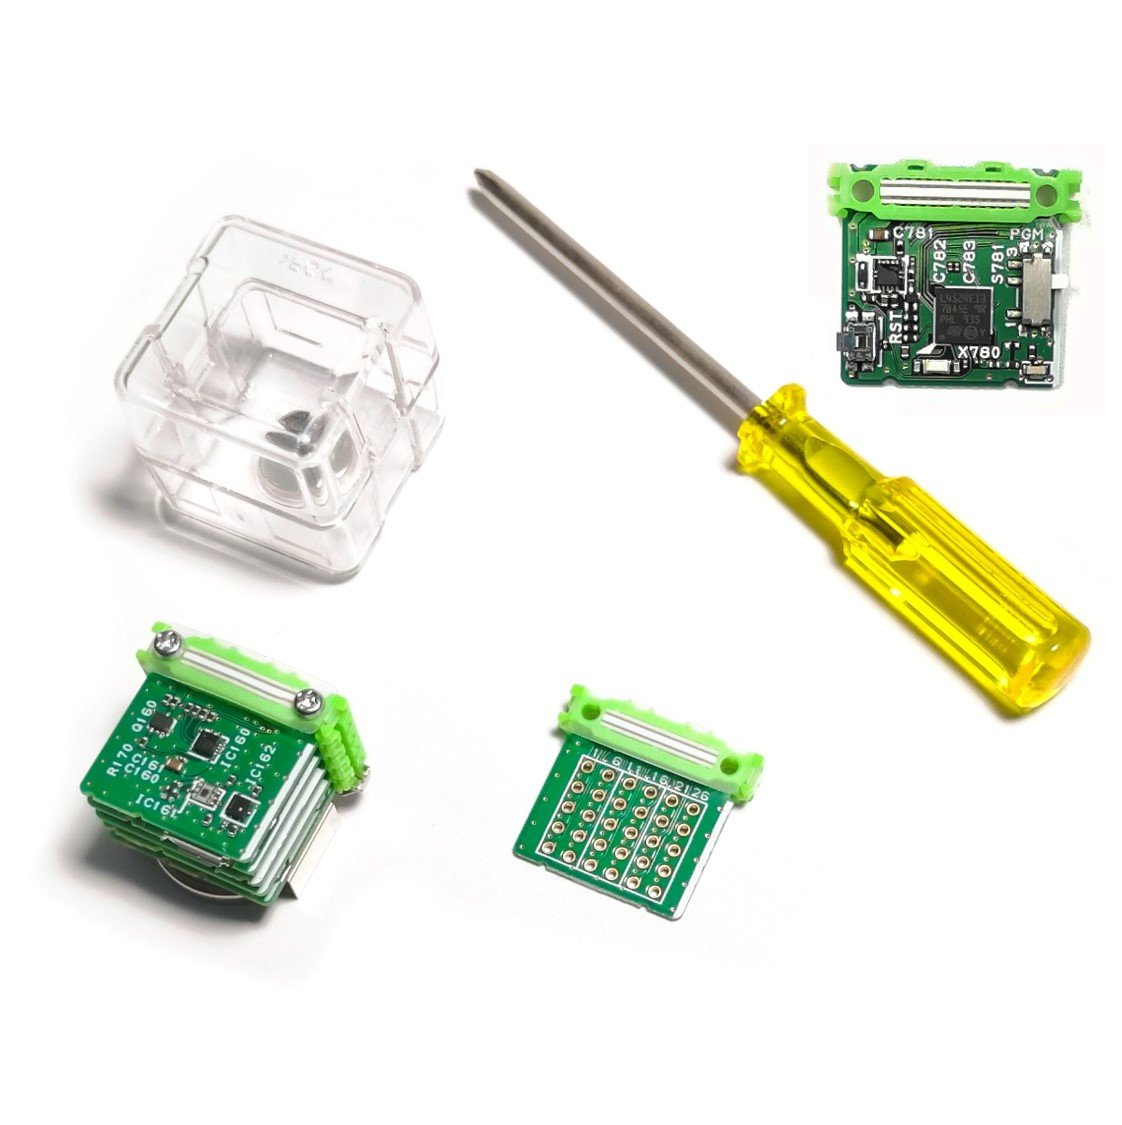
Basic Kit 2 lets you display sensor readings on a phone or computer. The kit comes assembled with an AVR MCU, and includes a separate STM32 MCU leaf. Both MCUs have a demo sketch installed, so you can try the original demos without uploading a program or setting up a development environment.
Leaves included in the kit
Section titled “Leaves included in the kit”7 types of leaves. Select a photo or name for specifications and pin assignments.


AP03 STM32 MCU


Accessories and other included items

AZ62 Connector Cover

AZ66 Basic Kit Case
- Product sheet× 1
- Product label× 1
- CR2032 coin cell battery× 1
- M2×18 mm screw× 2
- Screwdriver× 1
Try the preinstalled demos
Section titled “Try the preinstalled demos”- If this is your first time, start with the AVR demo. Keep the kit assembled and follow the Basic Kit guide. The same demo works with Basic Kit 2's AVR configuration.
- To try on-device logging and low-power operation, switch to STM32. Follow this page to replace the AVR MCU with the STM32 MCU.
The rest of this page covers the STM32 demo. If you have already uploaded a different sketch, see the STM32 Logger Beacon sample for instructions on uploading the original demo.
MOST OF THE TIME
Measure, store, broadcast
Beacon mode
One-way broadcast
- Periodically measure temperature, humidity, illuminance and battery voltage.
- Store readings in on-device memory (EEPROM).
- Broadcast readings by beacon, then sleep.
Power consumptionUltra-low
WHEN NEEDED
Set up and read the log
Connection mode
Two-way connection
- Initial setup: set the clock and measurement interval.
- Transfer stored data from on-device memory (EEPROM).
- Graph and analyze the downloaded data on a PC or Android phone*.
Power consumptionMedium
Qualitative comparison of the two modes in the demo.
Switching modes
BeaconConnection
Shake Leafony
Then select Connect in the web app.
Motion detection wakes the device and gives the app time to connect.
ConnectionBeacon
Select Disconnect in the web app.
The device resumes measuring, storing, broadcasting and sleeping.
First, connect to set the device clock. The demo needs the clock set before it can store readings.
Where the data goes
ConnectionRead and analyze the stored log
- Leafony memory
- PC / Android phone*
- Graphing / analysis
BeaconMonitor beacon readings nearby
- Leafony beacon
- Android phone*
- Real-time monitoring
BeaconApplication example: use Raspberry Pi as a receiver
- Leafony beacon
- Raspberry Pi
- Internet / cloud
- Phone: real-time graphing / analysis
This application example requires software for receiving and forwarding data, and a service for displaying it.
* Android only: the phone condition shown in the original demo diagram. The September 2022 guide also describes Bluefy for iPhone connections. Connecting and receiving live beacons have different browser requirements; see the browser notes below and the current compatibility table.
EEPROM here refers to the MCU’s internal Flash used to retain the log, rather than a separate memory leaf.
The STM32 demo normally measures, stores readings and broadcasts beacons, sleeping between cycles to reduce battery use. Connect to a PC or phone when you need to set the clock or measurement interval, or retrieve the stored log.
You can retrieve the readings stored in the device in a batch. Check the browser notes below for connecting or receiving beacons.
Required items and browser support
Section titled “Required items and browser support”- Basic Kit 2 and its CR2032 coin cell
- A Bluetooth-capable phone or computer
- Google Chrome on a supported system such as Android, Windows or Mac; Bluefy on iPhone or iPad
Web Bluetooth
Section titled “Web Bluetooth”The web app can retrieve and graph up to 169 samples stored in the device. Start with the steps below to connect, record measurements and retrieve the log.
Browser compatibility
Section titled “Browser compatibility”- Connecting to read the log and receiving beacons without a connection have different browser requirements. Chrome provides the connection feature on Android, Windows, Mac and other supported systems. The official compatibility table lists Linux as partially implemented and unsupported, requiring additional settings.
- Receiving beacons is optional. The web app describes this feature for Android. Chrome's Scanning API is experimental and requires
chrome://flags/#enable-experimental-web-platform-featureson a supported system. See the Web Bluetooth implementation status for details. - On iPhone and iPad, open the web app in Bluefy. The September 2022 guide reports that CSV download was unavailable. CSV download in this demo has not been retested with current Bluefy versions, so use the on-screen graph for your first check.
Demo video
Section titled “Demo video”-
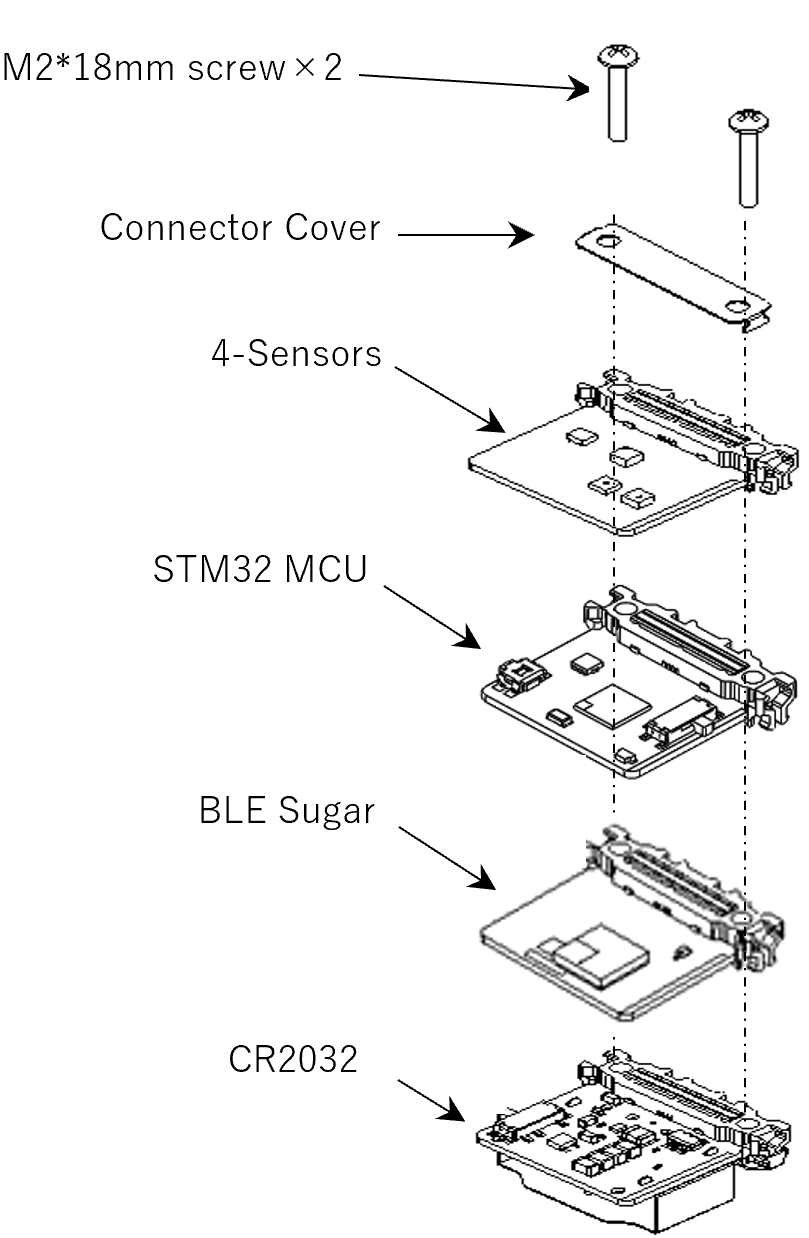
Turn the power off and disconnect USB before changing the leaves. Remove the Connector Cover from the STM32 MCU. Remove the AVR MCU and USB leaf from the assembled block, then install the STM32 MCU as shown.
-
Set the STM32 MCU's program switch to Run.

-
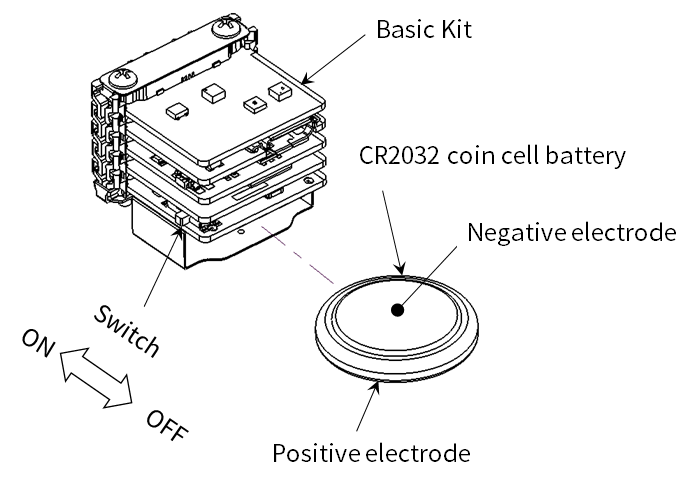
Insert the CR2032 coin cell and turn the power switch on.
View sensor readings
Section titled “View sensor readings”Connect and start logging
Section titled “Connect and start logging”- Turn Bluetooth on and open the STM32 Logger Beacon web app in a supported browser. Allow Bluetooth access if requested.
- Select Connect in the web app and shake Leafony to make it available for a connection. Select Leaf_A (the initial device name) from the list and pair. The connection sets the device's clock automatically.
- Select Disconnect. The device starts recording measurements and broadcasting beacons; wait for the measurement interval to pass. To check the interval while connected, open Initial Settings and select Check next to Sleep Time.
If the device does not appear in the list, shake it and try selecting it again. It waits for a connection for about 20 seconds.
Retrieve the log and view the graph
Section titled “Retrieve the log and view the graph”- Shake the device and reconnect using Connect in the web app.
- Under Get Sensors Data, select Get Data. After the stored data is received, graphs show temperature, humidity, illuminance and battery voltage.
- When finished, select Disconnect to resume logging.
When measurement times and values appear in the graphs, you can confirm the connection, recording and retrieval steps. Try beacon reception or CSV download after checking your browser's support.
Measurement interval and battery life
Section titled “Measurement interval and battery life”The measurement interval depends on the installed sketch and saved settings. The original guide estimates that intervals of several minutes may allow months of CR2032 coin cell operation. This is a theoretical estimate, not a measured runtime guarantee; battery condition, supply losses and the program's activity affect runtime. See low-power design for the calculation method.
Next steps
Section titled “Next steps”After trying the demo, set up a development environment when you want to upload your own programs.
- How STM32 Logger Beacon works and its source code
- STM32 development environment
- Write a Hello World program with PlatformIO
Restore the demo
Section titled “Restore the demo”If you uploaded a different program, use the MCU-specific demo restoration guide. Basic Kit 2 has separate AVR and STM32 demos; select the one for the MCU currently in the stack.