Read HTS221 Temperature and Humidity with ESP32
Explore with your favorite AI
 ChatGPT
  Claude
 Gemini & other AI
Copy this page’s context into your AI to explore how it works and what you can build.
 Open Gemini
 Copy the prompt, then paste it into Gemini’s message box.
View prompt
Overview
Section titled “Overview”This sample uses the AP02 ESP32 MCU leaf to read the HTS221 temperature and humidity sensor on the AI01 4-Sensors leaf and display the readings in the Arduino IDE serial monitor. It covers assembling the leaves, running the sketch and applying two-point correction using a reference instrument.
Leaf to use
Section titled “Leaf to use”Use the following leaves.
| Type | Name | Q’ty |
|---|---|---|
| AZ62 | Connector Cover | 2 |
| AI01 | 4-Sensors | 1 |
| AX07 | Back to back | 1 |
| AP02 | ESP32 MCU | 1 |
| AV04 | 2V~4.5V | 1 |
| AZ63 | Nut Plate | 2 |
| AAA battery holder | 1 | |
| AAA battery | 3 | |
| M2*8mm screw | 2 | |
| M2*12mm screw | 2 | |
| φ10x2mm magnet | 1 |
Assembly
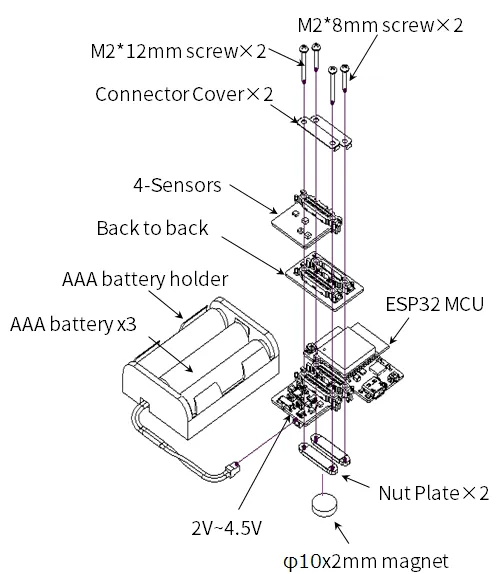
Section titled “Assembly”Let’s assemble leaves as shown in the figure below.
Source code
Section titled “Source code”Write the following program in the Arduino IDE.
The sketch requires additional libraries. If you have not installed them, follow the library installation guide.
//=====================================================================//  Thermo-hygrometer ESP32////    (c) 2021 LEAFONY SYSTEMS Co., Ltd//    Released under the MIT license//    https://opensource.org/licenses/MIT////      Rev.00 2021/04/01  First release//=====================================================================#include <Wire.h>#include <HTS221.h>
//---------------------------// Data for two-point correction//---------------------------// Temperature correction data 0float TL0 = 25.0;     // 4-Sensors Temperature measurement valuefloat TM0 = 25.0;     // Thermometer and other measurements value// Temperature correction data 1float TL1 = 40.0;     // 4-Sensors Temperature measurement valuefloat TM1 = 40.0;     // Thermometer and other measurements value
// Humidity correction data 0float HL0 = 60.0;     // 4-Sensors Humidity measurement valuefloat HM0 = 60.0;     // Hygrometer and other measurements value// Humidity correction data 1float HL1 = 80.0;     // 4-Sensors Humidity measurement valuefloat HM1 = 80.0;     // Hygrometer and other measurements value
void setup() {  // initialize serial communication at 115200 bit per second:  Serial.begin(115200);
  // I2C 初期化  pinMode(21, OUTPUT);      // SDA  digitalWrite(21, 0);  Wire.begin();             // I2C 100kHz
  // initialize i2c communication with HTS221:  smeHumidity.begin();  delay(10);}
void loop() {  // read temperature and humidity:  float dataTemp = (float)smeHumidity.readTemperature();  float dataHumid = (float)smeHumidity.readHumidity();
  // calibration:  dataTemp = TM0 + (TM1 - TM0) * (dataTemp - TL0) / (TL1 - TL0);      // 温度補正  dataHumid = HM0 + (HM1 - HM0) * (dataHumid - HL0) / (HL1 - HL0);    // 湿度補正
Serial.println(String(dataTemp) + "[℃], " + String(dataHumid) + "[%]"); delay(1000);}2 point-to-point correction
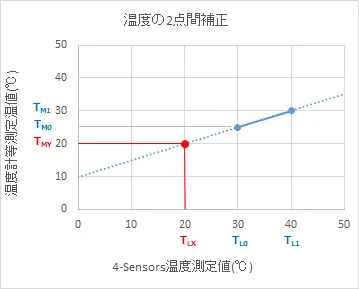
Section titled “2 point-to-point correction”If the temperature or humidity reported by 4-Sensors differs from the reference value, apply two-point correction. The following example uses temperature.
Measure two temperature points with both 4-Sensors and a reference instrument. Enter the measured values in the sample sketch and run it to bring the displayed 4-Sensors readings closer to the reference values.

Execution Results
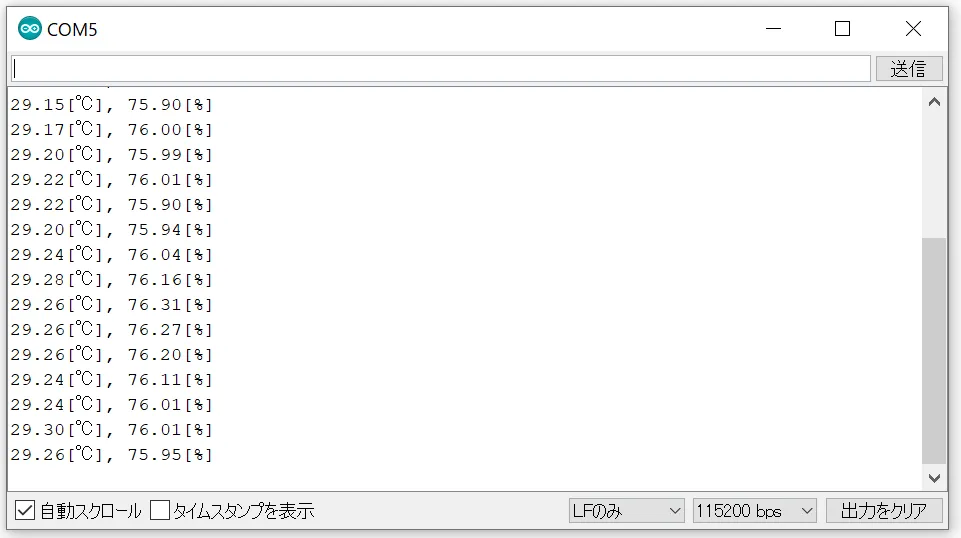
Section titled “Execution Results”Open the serial monitor in the Arduino IDE and set the baud rate to 115200 bps to display the temperature and humidity.