
Wi-Fi touch sensor (ESP32)
Explore with your favorite AI
 ChatGPT
  Claude
 Gemini & other AI
Copy this page’s context into your AI to explore how it works and what you can build.
 Open Gemini
 Copy the prompt, then paste it into Gemini’s message box.
View prompt
Overview
Section titled “Overview”This demo uses the Arduino sketch installed on the ESP32 MCU leaf at the factory. Connect your smartphone or PC to Leafony’s Wi-Fi to display touch sensor readings sent from the ESP32 in your web browser.
Leaf to use
Section titled “Leaf to use”Use the following leaves.
| Type | Name | Q’ty |
|---|---|---|
| AP02 | ESP32 MCU | 1 |
| AV04 | 2V~4.5V | 1 |
| AX07 | Back to back | 1 |
| AX08 | 29pin header | 1 |
| AZ62 | Connector Cover | 2 |
| AZ63 | Nut Plate | 2 |
| AAA battery holder | 1 | |
| AAA battery | 3 | |
| M2*15mm screw | 4 | |
| φ10x2mm magnet | 1 |
Assembly
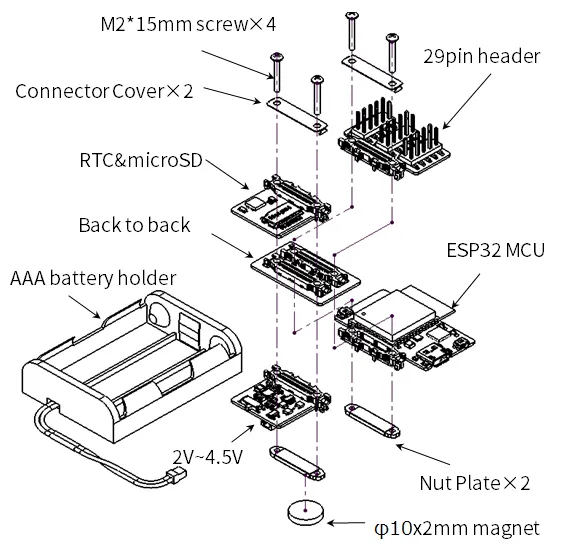
Section titled “Assembly”Assemble the leaves as shown in the figure below.
Pin assignment
Section titled “Pin assignment”Refer to the figure below for the pin assignment of each leaf.

Source code
Section titled “Source code”Download the ESP32_AP_Touch folder. Keep ESP32_AP_Touch.ino, esp32_ap_touch.h, web_server.cpp and web_server.h together in the same sketch folder. Copying the .ino file alone is not enough.
Upload the sketch
Section titled “Upload the sketch”- Complete Arduino IDE setup for AP02.
- Open
ESP32_AP_Touch.inofrom the downloaded folder. Check that the other source files appear in the IDE. - Select ESP32 Dev Module and the connected port, then compile. The sketch uses the Wi-Fi libraries provided by the ESP32 board package.
- Follow the setup page’s upload and Boot switch instructions to upload it to AP02. This replaces the program already on the MCU.
Execution method
Section titled “Execution method”Follow the ESP32 kit getting started guide to connect to Wi-Fi and open the demo. This page focuses on changing the source; the guide contains the battery, SSID and browser steps.
Change the detection threshold
Section titled “Change the detection threshold”In web_server.cpp, the printMsgIfTouched function defines THRESHOLD = 20. It displays Touch detected when the reading is at or below that value.
- Use the original sketch to note the values when touching and not touching pin 26.
- Change
THRESHOLDto a value between those readings and upload again. - Repeat the check both with and without a touch. Adjust the value if it detects a touch while idle or misses a touch.
The displayed inputs are pins 7, 9, 22, 26 and 28. Pin 24 is omitted because it conflicts with RTC & microSD. Check the pin assignment before adding an input.
Understand and change Wi-Fi settings
Section titled “Understand and change Wi-Fi settings”ESP32_AP_Touch.ino uses WiFi.softAP to create a network and WiFiServer to serve the page on port 80. WIFI_SSID and WIFI_PASSWORD set the network name and password. After changing them and uploading, reconnect your phone or computer with the new settings.
web_server.cpp reads the touch inputs and generates the HTML. The page’s 0 Stop and 1 second controls stop or resume automatic refresh. For connection problems, use ESP32 Wi-Fi troubleshooting. To restore the original behavior, upload an unmodified copy of this sketch.