
Blink an LED with STM32CubeIDE
Explore with your favorite AI
 ChatGPT
  Claude
 Gemini & other AI
Copy this page’s context into your AI to explore how it works and what you can build.
 Open Gemini
 Copy the prompt, then paste it into Gemini’s message box.
View prompt
Overview
Section titled “Overview”Turn the LED on the STM32 MCU leaf on and off at one-second intervals.
Before you start
Section titled “Before you start”This example targets AP03 STM32 MCU. Complete the STM32CubeIDE setup and prepare to program it with STM32CubeProgrammer. The project uses its included STM32 HAL and drivers; Arduino board packages and libraries are not required.
See How to run an example for obtaining complete source files and distinguishing build, upload, and execution checks.
Required leaves
Section titled “Required leaves”Use the following leaves.
| Type | Name | Quantity |
|---|---|---|
| AZ62 | Connector Cover | 1 |
| AZ01 | USB | 1 |
| AP03 | STM32 MCU | 1 |
| AV01 | CR2032 | 1 |
| CR2032 coin cell battery | 1 | |
| M2 × 10 mm screw | 2 |
Assembly
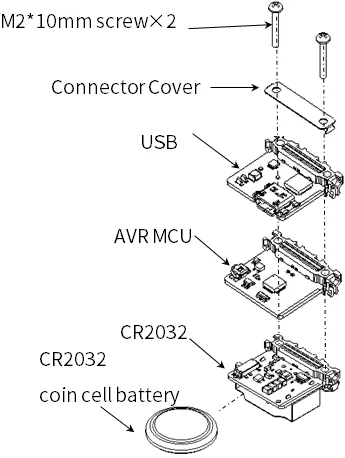
Section titled “Assembly”Assemble the leaves as shown below.
Source code
Section titled “Source code”- Obtain and extract the entire STM32CubeIDE-Sample-Software repository using
Code → Download ZIP. If you use Git, clone the same repository. - Locate the extracted
Blinkfolder. Use the complete project, including.project,.cproject,Core, andDrivers.main.calone cannot be built. - In STM32CubeIDE, choose
File → Import... → General → Existing Projects into Workspace. SetSelect root directoryto theBlinkfolder, select the Blink project, and clickFinish. - Choose
Project → Build Project. Check that it completes without errors and generatesDebug/Blink.elf.
The download links point to the main branch, which may be updated. Use a complete set from the same source instead of mixing newly downloaded files into an older project.
The following four lines inside while (1) in Core/Src/main.c control the LED. Line numbers vary by source revision.
HAL_GPIO_WritePin(GPIOH, GPIO_PIN_3, GPIO_PIN_SET); // LED onHAL_Delay(1000); // Wait 1000 msHAL_GPIO_WritePin(GPIOH, GPIO_PIN_3, GPIO_PIN_RESET); // LED offHAL_Delay(1000); // Wait 1000 msExecution results
Section titled “Execution results”- Follow the STM32CubeIDE programming procedure to program the generated
Debug/Blink.elf. Replace the Hello World filename in that procedure with the Blink file. - After confirming successful programming, set the AP03 program switch to Run and press its reset switch.
- Check that the AP03 LED repeatedly stays on for one second and off for one second. A successful build alone does not confirm programming or execution.
If the LED does not blink, check the power supply, ELF file programmed, program switch position, and reset after programming, in that order. If connection fails, see the FAQ.