Google Sheetsを使ったIoTサービス (ESP32設定)
ESP32の設定
Section titled “ESP32の設定”リーフを組み立ててスケッチを書き込み、データがGoogle Sheetsに書き込まれることを確認しましょう。
使用するリーフ
Section titled “使用するリーフ”以下のリーフを使用します。
| Type | Name | Q’ty |
|---|---|---|
| AZ62 | Connector Cover | 2 |
| AI01 | 4-Sensors | 1 |
| AX07 | Back to back | 1 |
| AP02 | ESP32 MCU | 1 |
| AV04 | 2V~4.5V | 1 |
| AZ63 | Nut Plate | 2 |
| AAA battery holder | 1 | |
| AAA battery | 3 | |
| M2*8mm screw | 2 | |
| M2*12mm screw | 2 | |
| φ10x2mm magnet | 1 |
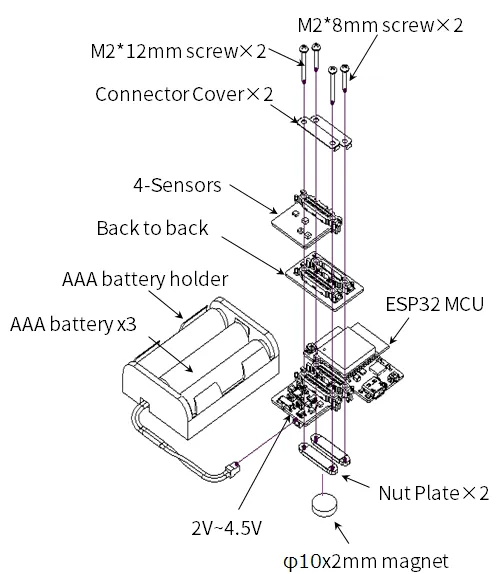
リーフの組み立て
Section titled “リーフの組み立て”ESP32 MCUリーフと4-Sensorsリーフを重ねて、下図のようにねじ止めします。
ソースコード
Section titled “ソースコード”Arduino IDEでプログラムを書きましょう。
Githubのソースコードの以下の箇条書きの内容に注意して修正し、ESP32リーフに書き込んでください。
- アクセスする
WiFiの情報を以下の定数に代入してください。
const char* SSID = "wifi_ssid"; // WiFi SSIDconst char* PASSWORD = "wifi_password"; // WiFi Password- 先ほど作成したウェブアプリの情報を以下の定数に代入してください。
- アプリ固有のURLより:const char* KEY =
AKfycbxbxoqWzuN8Eztplnhf3ywC-0QpWc8utkIY1QLngj4fHJFRvZKh
- アプリ固有のURLより:const char* KEY =
const char* KEY = "google_scripts_key";- センサデータの書き込みの時間間隔を調整したいときは以下の定数に代入してください。
- 単位は秒です
uint64_t DEEP_SLEEP_TIME_SEC = 60;#include <Arduino.h>#include <Wire.h>#include <HTTPClient.h>#include <HTS221.h>#include <ClosedCube_OPT3001.h>
// Unique IDString UniqueID = "Leafony_AP02";
// Connecting WiFi Settingsconst char* SSID = "wifi_ssid"; // WiFi SSIDconst char* PASSWORD = "wifi_password"; // WiFi Password// Accessed Google Script Settingsconst char* APP_SERVER = "script.google.com";const char* KEY = "google_scripts_key";
// Device sleep time (sec) to reduce Joule heatuint64_t DEEP_SLEEP_TIME_SEC = 60;
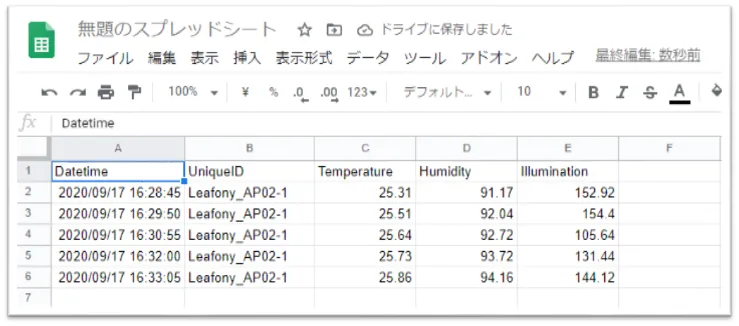
// 省略Arduinoを実行して、逐次センサデータがGoogle Sheetsに書き込まれます。