
Log and Visualize ESP32 Sensor Data in Google Sheets
Explore with your favorite AI
 ChatGPT
  Claude
 Gemini & other AI
Copy this page’s context into your AI to explore how it works and what you can build.
 Open Gemini
 Copy the prompt, then paste it into Gemini’s message box.
View prompt
Overview
Section titled “Overview”Add a temperature and humidity sensor to ESP32 Wi-Fi Kit 2 to build an environmental sensor. Connect it to the internet to record and visualize readings in Google Sheets.
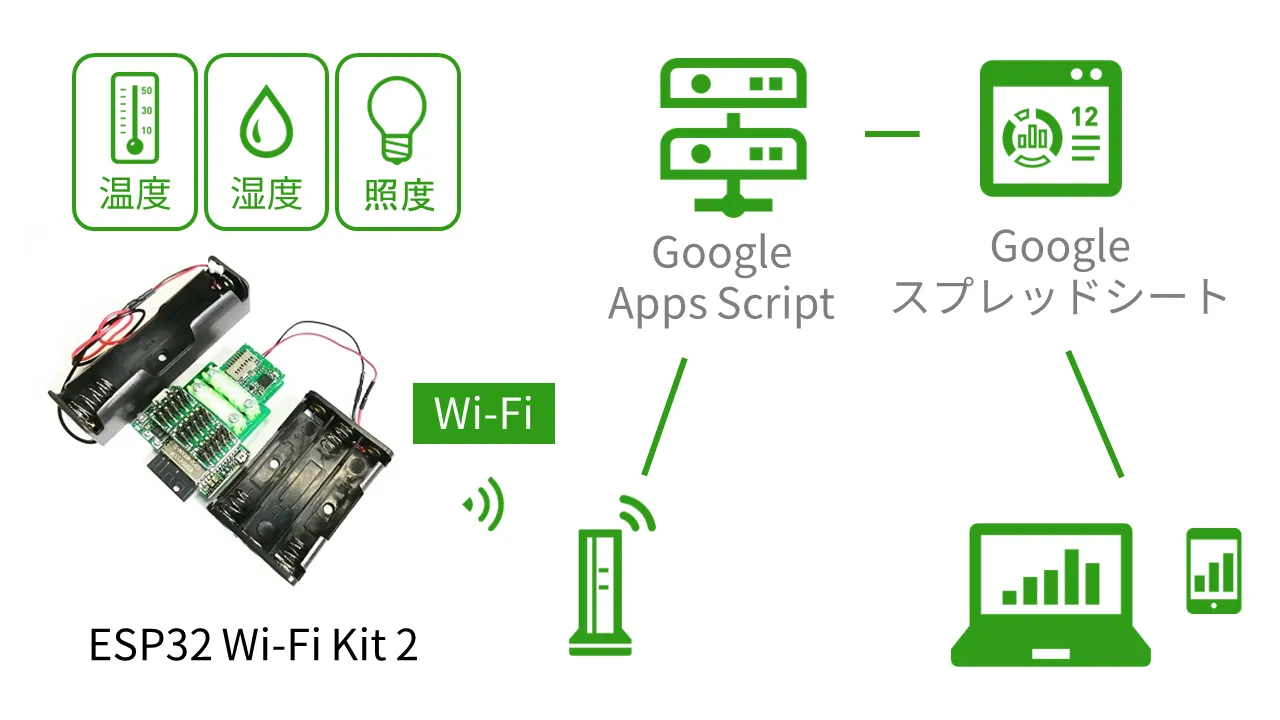
What to prepare
Section titled “What to prepare”- ESP32 Wi-Fi Kit 2 (Japanese)
- One of the following sensors:
- Three AAA nickel-metal hydride batteries
- A development computer
- A Wi-Fi router
Demo video
Section titled “Demo video”
Set up Google Apps Script
Section titled “Set up Google Apps Script”Use Google Apps Script to create the web app that receives readings from Leafony.
- Open Google Sheets and create a spreadsheet.
- In the spreadsheet, select Extensions → Apps Script and paste the code below. Replace
spreadsheetIdwith your spreadsheet ID, as described in the Google Sheets concepts guide. ReplacesheetNamewith the name of the sheet tab; use its actual name, such asSheet1orシート1.
function doGet(e) {
    let id = 'spreadsheetId'; //Insert spreadsheetId    let sheetName = 'sheetName'; //Insert sheetName    var result;
    // e.parameter has received GET parameters, i.e. temperature, humidity, illumination    if (e.parameter == undefined) {        result = 'Parameter undefined';    } else {        var sheet = SpreadsheetApp.openById(id).getSheetByName(sheetName);        var newRow = sheet.getLastRow() + 1;  // get row number to be inserted        var rowData = [];
        // get current time        rowData[0] = new Date();        rowData[1] = e.parameter.UniqueID;        rowData[2] = e.parameter.temperature;        rowData[3] = e.parameter.humidity;        rowData[4] = e.parameter.illumination;
        // 1 x rowData.length cells from (newRow, 1) cell are specified        var newRange = sheet.getRange(newRow, 1, 1, rowData.length);
        // insert data to the target cells        newRange.setValues([rowData]);        result =  'Ok';    }
    return ContentService.createTextOutput(result);}
Deploy Google Apps Script
Section titled “Deploy Google Apps Script”Deploy the script to obtain the web app URL.2
- Open Extensions → Apps Script from the spreadsheet.
- Select Deploy → New deployment at the top right.
- Under Select type, choose Web app.
- Leave the description empty if desired, set Execute as to Me, and set Who has access to Anyone. Select Deploy.
- Select Authorize access to grant access to your data.
- When deployment finishes, copy both the Deployment ID and Web app URL. The sketch uses the deployment ID; the URL is used to test Google Apps Script.
- Select Done.
Assemble Leafony
Section titled “Assemble Leafony”With DHT22
Section titled “With DHT22”Take ESP32 Wi-Fi Kit 2 out of its box and connect DHT22 to the 29pin header as follows.
| DHT22 | 29pin header |
|---|---|
| VCC-power supply | 1 |
| DAT-signal | 15 |
| GND | 27 |
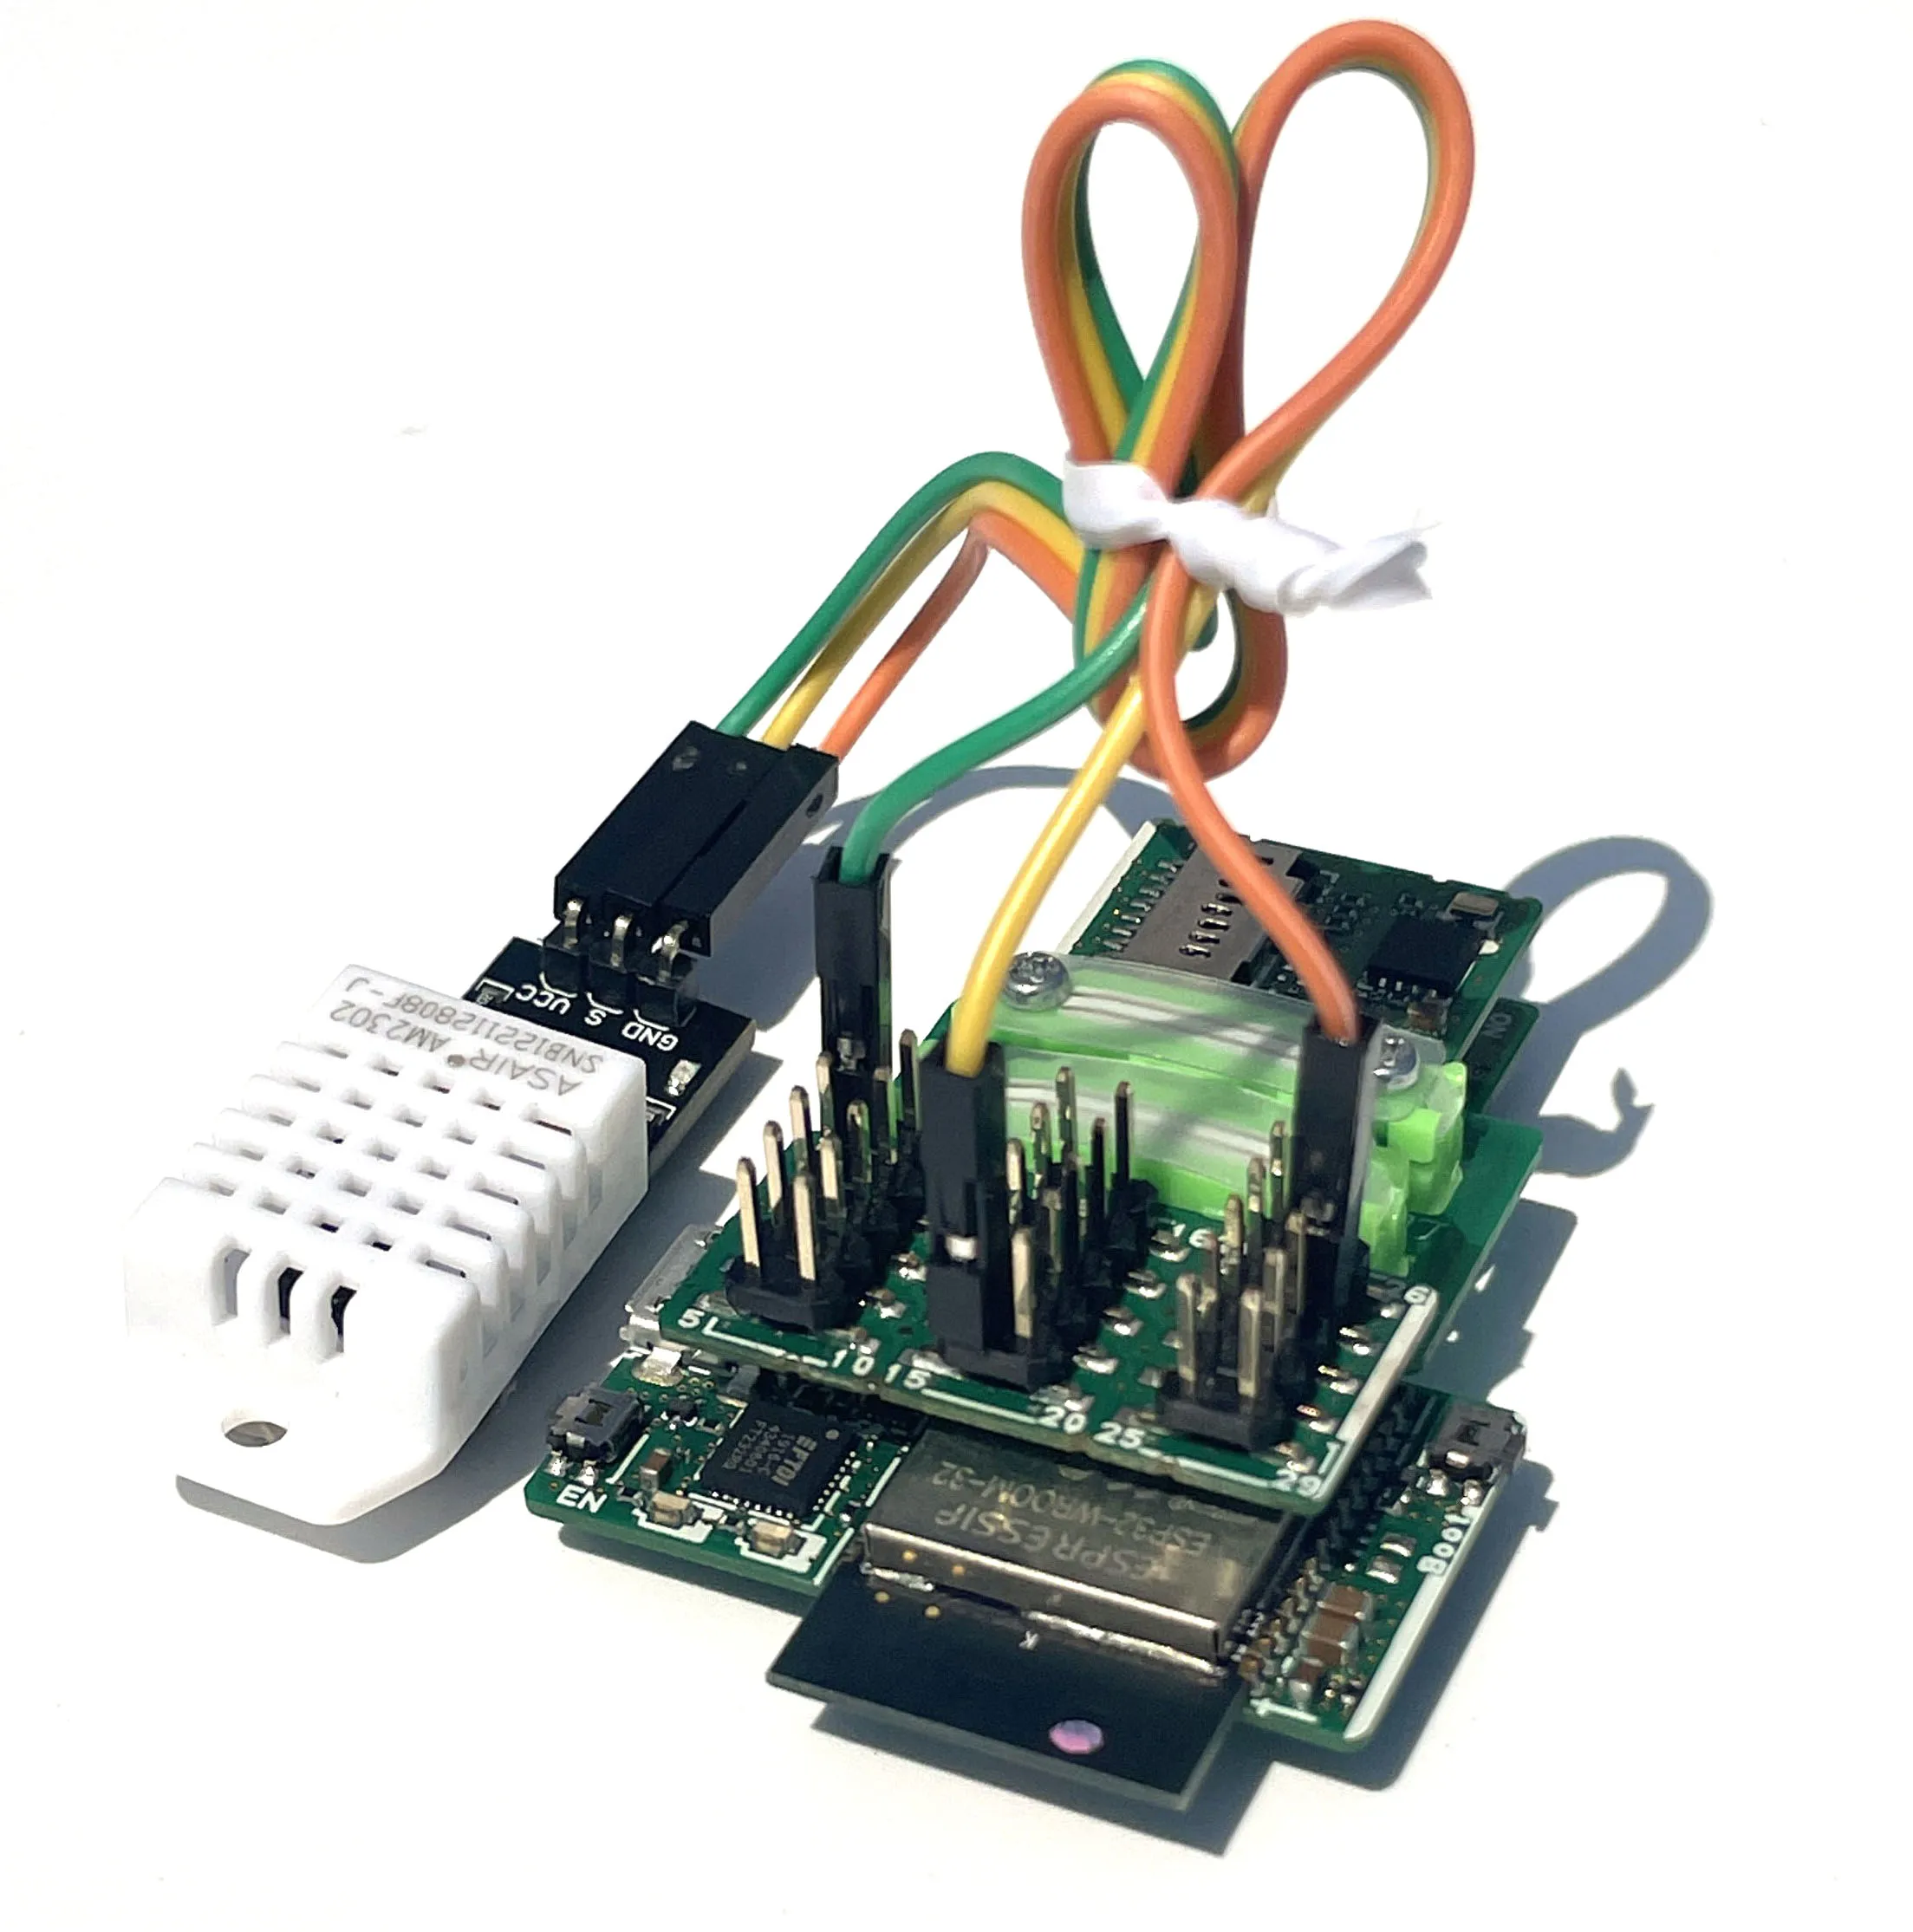
With 4-Sensors
Section titled “With 4-Sensors”Remove the RTC & microSD leaf from ESP32 Wi-Fi Kit 2 and install 4-Sensors.
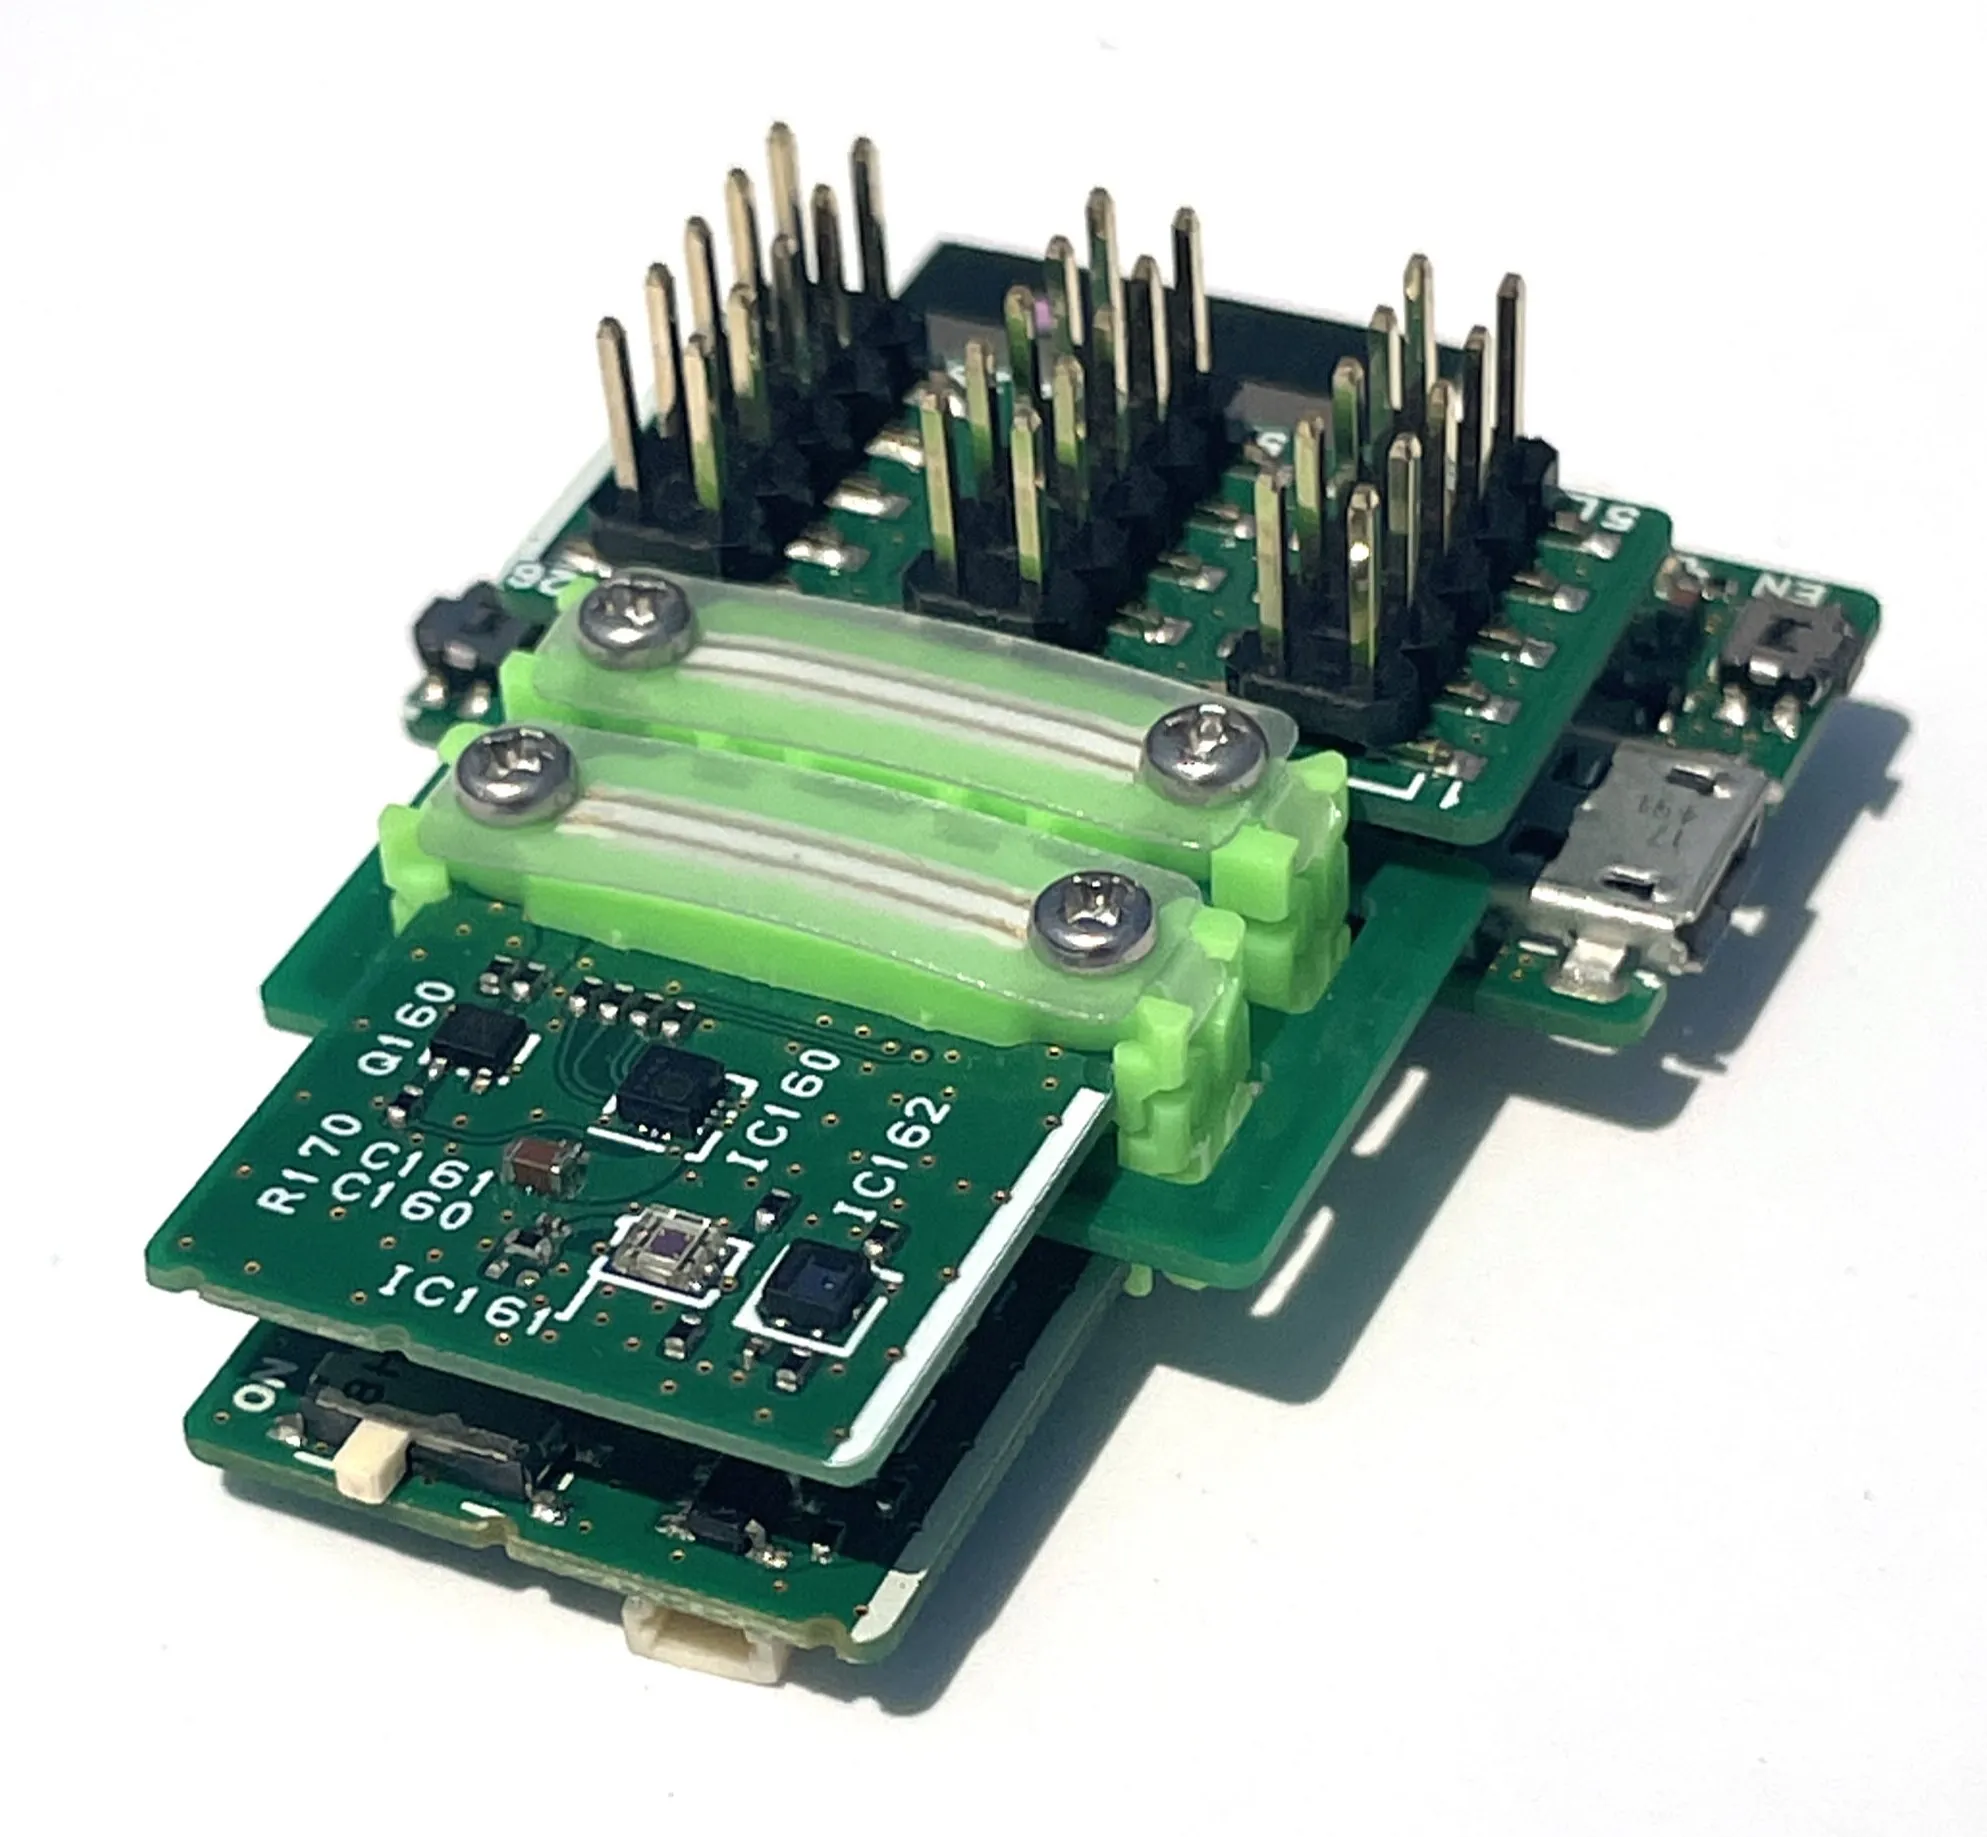
Source code
Section titled “Source code”Set up the development environment
Section titled “Set up the development environment”Configure either Arduino IDE or PlatformIO IDE.
Download the source code
Section titled “Download the source code”Download the project for your sensor and IDE to your development computer.
| IDE | DHT22 | 4-Sensors |
|---|---|---|
| Arduino IDE | Arduino DHT22 source | Arduino 4-Sensors source |
| PlatformIO IDE | PlatformIO DHT22 source | PlatformIO 4-Sensors source |
The DHT22 example uses the DHT sensor library.
Edit the source code
Section titled “Edit the source code”For a personal or home Wi-Fi router using WPA2 Personal,3 set:
ssid: the router’s SSID.password: the router’s password.google_scripts_key: the Google Apps Script deployment ID.
For a university or company network using WPA2 Enterprise,4 set:
- Remove
//from//#define ENTERPRISE. identity: your user ID.password: your user password.ssid: the router’s SSID.google_scripts_key: the Google Apps Script deployment ID.
Upload the source code
Section titled “Upload the source code”After editing, connect Leafony to your computer and upload the sketch.
Results
Section titled “Results”- In the first row of the spreadsheet, enter the column headings
Datetime,UniqueID,Temperature,HumidityandIllumination.5 - Press the reset button on the ESP32 MCU leaf to run the program. Sensor readings are written to the spreadsheet.
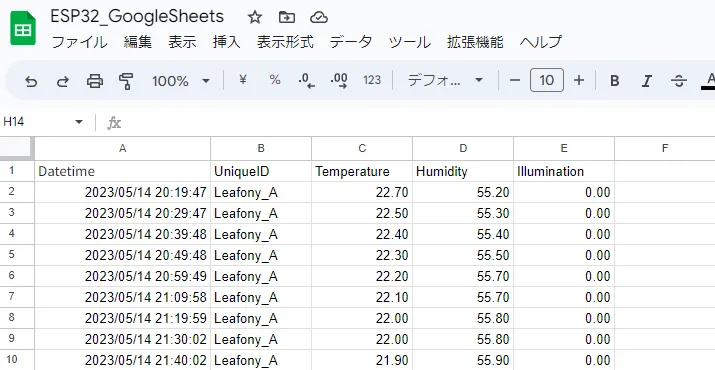
Test Google Apps Script
Section titled “Test Google Apps Script”- Append
?UniqueID=Leafony_A&temperature=10&humidity=20&illumination=30to your web app URL and open it in a browser. - Check that a row containing the date and time,
Leafony_A,10,20and30appears in the spreadsheet.
Edit Google Apps Script
Section titled “Edit Google Apps Script”- Open Extensions → Apps Script from the spreadsheet.
- Select Deploy → Manage deployments.
- Select the edit icon, choose New version, and select Deploy.
Plot the spreadsheet in Grafana
Section titled “Plot the spreadsheet in Grafana”Grafana can plot the readings stored in Google Sheets. Follow the Windows installation guide, start the server, and open http://localhost:3000/. For the first sign-in, use admin as both username and password, then change the password.
-
Install the Google Sheets data source plugin. Follow the official configuration guide to find Google Sheets under Connections and add the data source.
-
Choose authentication to match the spreadsheet’s sharing settings: API Key for a public sheet, or a service account with Google JWT File for a private sheet.6 Select Save & test to check the connection.
-
Add a visualization panel to a dashboard and select the Google Sheets data source. Follow the query editor guide to set:
- Spreadsheet ID: the spreadsheet ID or URL.
- Range: for example,
Sheet1!A:Eto include the columns from date/time through illuminance. ReplaceSheet1with your actual tab name. - Cache Time: the default is
5m(five minutes). Set0sto disable caching. - Use Time Filter: enable this to filter the date/time column using the dashboard’s selected time range.
Menu labels may vary with the Grafana and plugin versions.
Footnotes
Section titled “Footnotes”-
Deployment makes software available for use. For Google Apps Script, it makes the web app executable and gives it a URL. ↩
-
WPA2 Personal is commonly used in homes and small offices, with a password configured on each device. ↩
-
WPA2 Enterprise is intended for larger networks, with an ID and password registered for each user. ↩
-
Illuminance readings are only available with 4-Sensors. ↩
-
API key authentication in Grafana requires a publicly shared spreadsheet. Use service account authentication for a private sheet. Enable the Google Sheets API in Google Cloud, configure credentials and grant access to the sheet as described in the official authentication guide. ↩