
STM32: Read the accelerometer
Explore with your favorite AI
 ChatGPT
  Claude
 Gemini & other AI
Copy this page’s context into your AI to explore how it works and what you can build.
 Open Gemini
 Copy the prompt, then paste it into Gemini’s message box.
View prompt
Overview
Section titled “Overview”This sample reads the value of the accelerometer on the 4-Sensors Leaf and displays it on a serial monitor.
Before you start
Section titled “Before you start”Complete the Arduino IDE setup for AP03 and select Leafony STM32 MCU as the board. The sensor is the LIS3DH on AI01 4-Sensors. Install Adafruit LIS3DH and the dependencies offered during installation through the Library Manager.
The sketch uses I2C address 0x19. If you use a leaf with a changed address setting, check the I2C address map and match LIS3DH_ADDRESS to it. See How to run an example for obtaining the source, uploading, and checking the result.
Leaf to use
Section titled “Leaf to use”Use the following leaves.
| Type | Name | Q’ty |
|---|---|---|
| AZ62 | Connector Cover | 1 |
| AI01 | 4-Sensors | 1 |
| AZ01 | USB | 1 |
| AP03 | STM32 MCU | 1 |
| AV01 | CR2032 | 1 |
| CR2032 coin cell battery | 1 | |
| M2*15mm screw | 2 |
Assembly
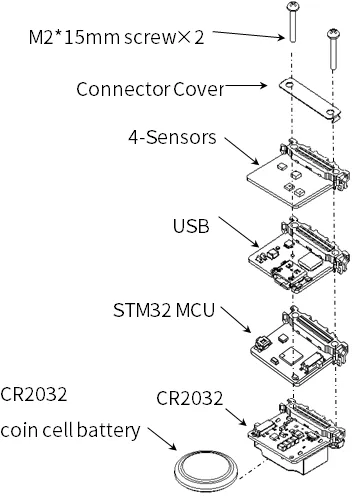
Section titled “Assembly”Let’s assemble leaves as shown in the figure below.
Source code
Section titled “Source code”Write the following program1 in the Arduino IDE.
In order to make this sketch work, you need to install the libraries. If you haven’t installed it yet, refer to Environment to install it.
//=====================================================================//  Accelerometer////    (c) 2021 LEAFONY SYSTEMS Co., Ltd//    Released under the MIT license//    https://opensource.org/licenses/MIT////      Rev.00 2021/04/01  First release//=====================================================================#include <Adafruit_LIS3DH.h>
#define LIS3DH_ADDRESS 0x19
Adafruit_LIS3DH accel = Adafruit_LIS3DH();
void setup() {  // initialize serial communication at 115200 second per second:  Serial.begin(115200);  // initialize i2c communication with LIS3DH:  accel.begin(LIS3DH_ADDRESS);
  accel.setClick(0, 0);                      // Disable Interrupt  accel.setRange(LIS3DH_RANGE_2_G);          // Full scale +/- 2G  accel.setDataRate(LIS3DH_DATARATE_10_HZ);  // Data rate = 10Hz
  delay(100);}
void loop() {    accel.read();
    Serial.print("X [g] = " + String(accel.x_g));    Serial.print(", ");    Serial.print("Y [g] = " + String(accel.y_g));    Serial.print(", ");    Serial.print("Z [g] = " + String(accel.z_g));    Serial.println("");
delay(100);}Execution Results
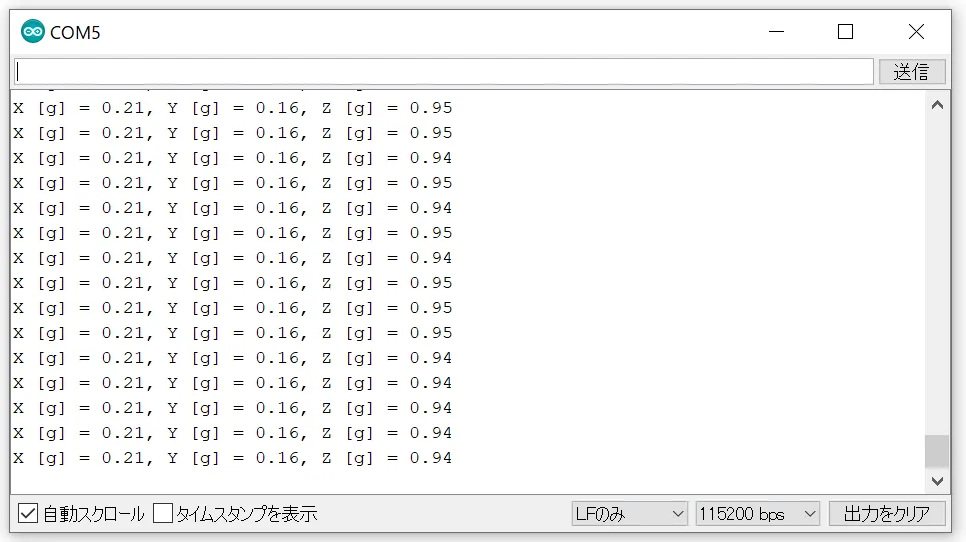
Section titled “Execution Results”After uploading, set the AP03 program switch to Run and press its reset switch. Open the Arduino IDE serial monitor at 115200 bps. Values labeled X [g], Y [g], and Z [g] appear repeatedly. This sketch does not calculate an angle.
Gently tilt the leaves and check that the axis values change. Gravity contributes to the readings even when the leaves are stationary, so all three axes do not need to read zero.
Troubleshooting
Section titled “Troubleshooting”| Symptom | What to check |
|---|---|
Adafruit_LIS3DH.h is not found | Check that Adafruit LIS3DH and its dependencies are installed |
| Garbled text or no output | Check the serial port, 115200 bps setting, Run switch position, and reset |
| Values do not change when tilted | Turn off the power before checking the AI01 connection, then compare its I2C address with LIS3DH_ADDRESS |
Turn off the power before attaching or removing leaves. If connection or upload fails, see the FAQ.
Footnotes
Section titled “Footnotes”-
The program is the same as AVR MCU Leaf. ↩