IoT services using Google Sheets
ESP32 configuration
Assemble the leaves, write a sketch, and make sure the data is written to Google Sheets.
Leaf to use
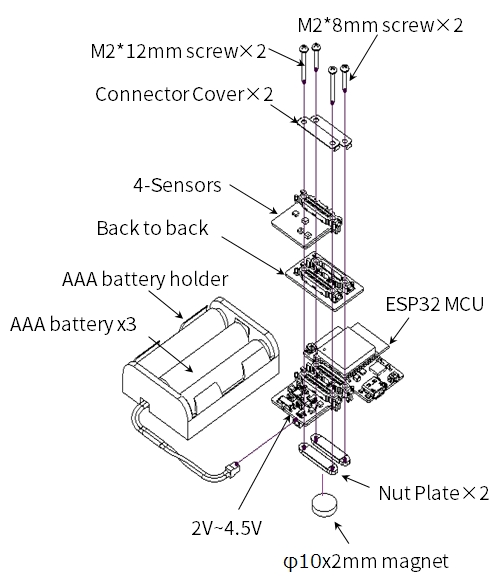
Use the following leaves.
| Type | Name | Q’ty |
|---|---|---|
| AZ62 | Connector Cover | 2 |
| AI01 | 4-Sensors | 1 |
| AX07 | Back to back | 1 |
| AP02 | ESP32 MCU | 1 |
| AV04 | 2V~4.5V | 1 |
| AZ63 | Nut Plate | 2 |
| AAA battery holder | 1 | |
| AAA battery | 3 | |
| M2*8mm screw | 2 | |
| M2*12mm screw | 2 | |
| φ10x2mm magnet | 1 |
Assembly
Stack the ESP32 MCU leaf and the 4-Sensors leaf on top of each other and screw them together as shown below.
Source code
Write the program in the Arduino IDE.
Note the following bullets in the Github source code, modify it, and write it to ESP32 leaf.
- Substitute the following constants for the information of the
WiFito be accessed.
const char* SSID = "wifi_ssid";    // WiFi SSID
const char* PASSWORD = "wifi_password";  // WiFi Password
- Substitute the following constants for the web app information you just created.
- From the app-specific URL:const char* KEY =
AKfycbxbxoqWzuN8Eztplnhf3ywC-0QpWc8utkIY1QLngj4fHJFRvZKh
- From the app-specific URL:const char* KEY =
const char* KEY = "google_scripts_key";
- If you want to adjust the time interval for writing sensor data, substitute the following constants.
- Units are in seconds.
uint64_t DEEP_SLEEP_TIME_SEC = 60;
#include <Arduino.h>
#include <Wire.h>
#include <HTTPClient.h>
#include <HTS221.h>
#include <ClosedCube_OPT3001.h>

// Unique ID
String UniqueID = "Leafony_AP02";

// Connecting WiFi Settings
const char* SSID = "wifi_ssid";           // WiFi SSID
const char* PASSWORD = "wifi_password";   // WiFi Password
// Accessed Google Script Settings
const char* APP_SERVER = "script.google.com";
const char* KEY = "google_scripts_key";

// Device sleep time (sec) to reduce Joule heat
uint64_t DEEP_SLEEP_TIME_SEC = 60;

// 省略
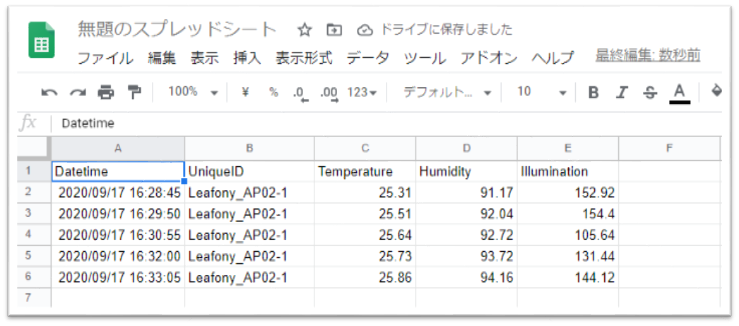
Execution result
Run Arduino and sequential sensor data will be written to Google Sheets.
前のページに戻る
Last modified 03.03.2021