LCD
Overview
With an LCD (liquid crystal display) leaf, you can easily display strings on the screen.
It also comes with two button switches and can be used as a controller.
Leaf to use
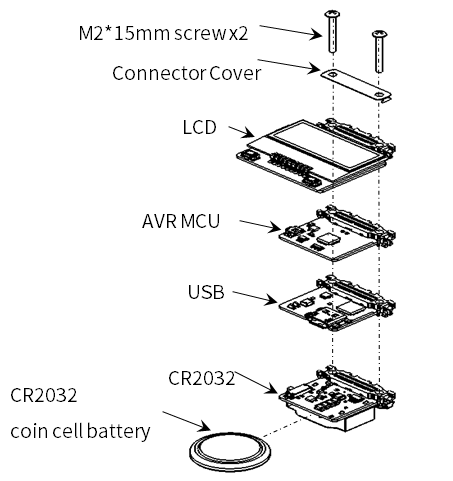
Let’s assemble leaves as shown in the figure below.
| Name | Q’ty | |
|---|---|---|
| AZ62 | Connector Cover | 1 |
| AI04 | LCD | 1 |
| AP01 | AVR MCU | 1 |
| AZ01 | USB | 1 |
| AV01 | CR2032 | 1 |
| CR2032 coin cell battery | 1 | |
| M2*15mm screw | 2 |
Assembly
Let’s assemble leaves as shown in the figure below.
Source code
Write the following program in the Arduino IDE.
In order to use MIC&VR&LED Leaf, you need to install the library. If you haven’t installed it yet, refer to Environment to install it.
//=====================================================================
//  Leafony Platform sample sketch
//     Application  : LCD SW test
//     Processor    : ATmega328P (3.3V /8MHz)
//
//     Leaf configuration
//       (1) AI04 LCD
//       (2) AP01 AVR MCU
//       (3) AZ01 USB
//
//		(c) 2020  Trillion-Node Study Group
//		Released under the MIT license
//		https://opensource.org/licenses/MIT
//
//      Rev.00 2019/08/01  First release
//=====================================================================
// use libraries
//  ST7032 - Arduino LiquidCrystal compatible library
//    https://github.com/tomozh/arduino_ST7032
//=====================================================================

//---------------------------------------------------------------------
// difinition
//---------------------------------------------------------------------
#include <Wire.h>                   // I2C
#include <ST7032.h>                 // LCD

//-----------------------------------------------
// IO pin name definition
// Define it according to the leaf to be connected.
//-----------------------------------------------
#define SW1         2                   // PD2  (INT0)

//-----------------------------------------------
// Define constants to be used in the program
//-----------------------------------------------
#define I2C_EXPANDER_ADDR   0x1A

//---------------------------------------------------------------------
// object
//---------------------------------------------------------------------
//------------------------------
// LCD
//------------------------------
ST7032 lcd;

//====================================================================
// setup
//====================================================================
void setup(){
  pinMode(SW1, INPUT);                                //LCD SW1
  Wire.begin();

  // IO Expander Initialize
  i2c_write_byte(I2C_EXPANDER_ADDR, 0x03, 0xFE);
  i2c_write_byte(I2C_EXPANDER_ADDR, 0x01, 0x01);      // LCD Power on

  //LCD Initialize
  lcd.begin(8, 2);                                    // 8 characters, 2 lines
  lcd.setContrast(30);
  lcd.clear();

  lcd.print(" Hello!");
  lcd.setCursor(0, 1);
  delay(3000);

  i2c_write_byte(I2C_EXPANDER_ADDR, 0x01, 0x00);      // LCD Power off
  delay(3000);

  i2c_write_byte(I2C_EXPANDER_ADDR, 0x01, 0x01);      // LCD Power on

  // LCD Initialize
  lcd.begin(8, 2);                                    // 8 characters, 2 lines
  lcd.setContrast(30);
  lcd.clear();

  lcd.print("12345678");
  lcd.setCursor(0, 1);
  lcd.print("87654321");
  delay(3000);

  lcd.clear();

  lcd.blink();
  int i;
  for (i=0 ; i<8 ;i++){
     lcd.setCursor(i, 0);
      delay(1000);
  }
  for (i=0 ; i<8 ;i++){
     lcd.setCursor(i, 1);
      delay(1000);
  }
  lcd.noBlink();
}

//====================================================================
// Main loop
//====================================================================
void loop(){
  char val;

  // SW 1
  val = digitalRead(SW1);
  lcd.setCursor(0, 0);
  if (val == 1) {
     lcd.print("SW1 is H");
  }else{
     lcd.print("SW1 is L");
  }

  // SW 2
  val = i2c_read_byte(I2C_EXPANDER_ADDR, 0x00);
  lcd.setCursor(0, 1);
  if ((val & 0x02) == 0x02)  {
     lcd.print("SW2 is H");
  }
  else {
    lcd.print("SW2 is L");
  }
  delay(1000);
}

//=====================================================================
// I2C control function
//=====================================================================
//-----------------------------------------------
//I2C Write 1 byte to the slave device
//-----------------------------------------------
void i2c_write_byte(int device_address, int reg_address, int write_data){
  Wire.beginTransmission(device_address);
  Wire.write(reg_address);
  Wire.write(write_data);
  Wire.endTransmission();
}

//-----------------------------------------------
//I2C Read 1 byte from the slave device
//-----------------------------------------------
unsigned char i2c_read_byte(int device_address, int reg_address){

  int read_data = 0;

  Wire.beginTransmission(device_address);
  Wire.write(reg_address);
  Wire.endTransmission(false);

  Wire.requestFrom(device_address, 1);
  read_data = Wire.read();

  return read_data;
}
Execution Results
On the LCD the screens are displayed in the following order
- The “Hello” string
- Moving the cursor
- Button input status display
Last modified 06.04.2021