LCD
Overview
With an LCD (liquid crystal display) leaf, you can easily display strings on the screen.
It also comes with two button switches and can be used as a controller.
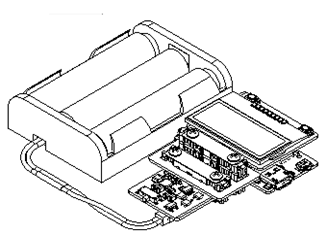
Leaf to use
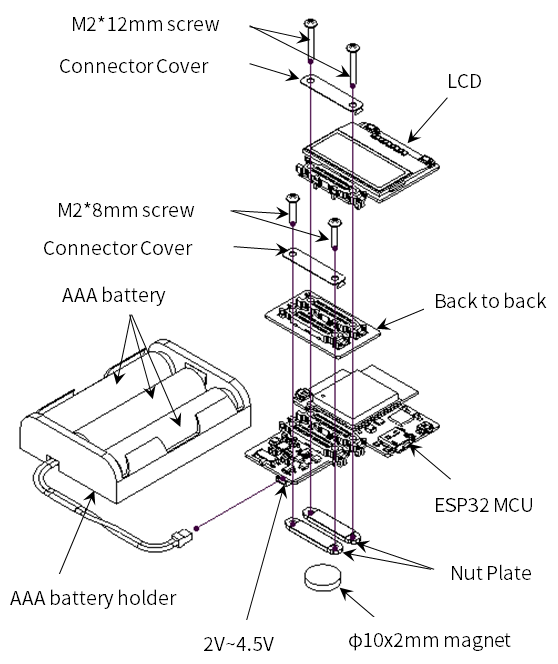
| Type | Name | Q’ty |
|---|---|---|
| AZ62 | Connector Cover | 2 |
| AI04 | LCD | 1 |
| AX07 | Back to back | 1 |
| AP02 | ESP32 MCU | 1 |
| AV04 | 2V~4.5V | 1 |
| AZ63 | Nut Plate | 2 |
| AAA battery holder | 1 | |
| AAA battery | 3 | |
| M2*8mm screw | 2 | |
| M2*12mm screw | 2 | |
| φ10x2mm magnet | 1 |
Assembly
Let’s assemble leaves as shown in the figure below.
Source code
Write the following program in the Arduino IDE.
In order to make this sketch work, you need to install the libraries If you haven’t installed it yet, refer to Environment to install it.
//=====================================================================
//  Leafony Platform sample sketch
//     Application  : LCD SW test
//     Processor    : ESP32-WROOM-32 (ESP32 Dev Module)
//     Arduino IDE  : 1.8.13
//     Arduino ESP32: 1.0.4
//
//     Leaf configuration
//       (1) AI04 LCD
//       (2) AP02 ESP32 MCU
//
//		(c) 2020  Trillion-Node Study Group
//		Released under the MIT license
//		https://opensource.org/licenses/MIT
//
//      Rev.00 2020/08/20  First release
//=====================================================================
//use libraries
//ST7032 - Arduino LiquidCrystal compatible library
//https://github.com/tomozh/arduino_ST7032
//=====================================================================

//---------------------------------------------------------------------
// difinition
//---------------------------------------------------------------------
#include <Wire.h>                   // I2C
#include <ST7032.h>                 // LCD

//-----------------------------------------------
// IO pin name definition
// Define it according to the leaf to be connected.
//-----------------------------------------------
#define SW1   4                   // D2 IO4

//-----------------------------------------------
// Define constants to be used in the program
//-----------------------------------------------
#define I2C_EXPANDER_ADDR   0x1A

//---------------------------------------------------------------------
// object
//---------------------------------------------------------------------
//------------------------------
// LCD
//------------------------------
ST7032 lcd;

//====================================================================
// setup
//====================================================================
void setup(){

  pinMode(SW1, INPUT);                    //LCD SW1
  Wire.begin();

  // IO Expander Initialize
  i2c_write_byte(I2C_EXPANDER_ADDR, 0x03, 0xFE);
  i2c_write_byte(I2C_EXPANDER_ADDR, 0x01, 0x01);      // LCD Power on

  //LCD Initialize
  lcd.begin(8, 2);                      // 8 characters, 2 lines
  lcd.setContrast(30);
  lcd.clear();

  lcd.print(" Hello!");
  lcd.setCursor(0, 1);
  delay(3000);

  i2c_write_byte(I2C_EXPANDER_ADDR, 0x01, 0x00);      // LCD Power off
  delay(3000);

  i2c_write_byte(I2C_EXPANDER_ADDR, 0x01, 0x01);      // LCD Power on

  // LCD Initialize
  lcd.begin(8, 2);                      // 8 characters, 2 lines
  lcd.setContrast(30);
  lcd.clear();

  lcd.print("12345678");
  lcd.setCursor(0, 1);
  lcd.print("87654321");
  delay(3000);

  lcd.clear();

  lcd.blink();
  int i;
  for (i=0 ; i<8 ;i++){
     lcd.setCursor(i, 0);
      delay(1000);
  }
  for (i=0 ; i<8 ;i++){
     lcd.setCursor(i, 1);
      delay(1000);
  }
  lcd.noBlink();
}

//====================================================================
// Main loop
//====================================================================
void loop() {
  char val;

  // SW 1
  val = digitalRead(SW1);
  lcd.setCursor(0, 0);
  if (val == 1) {
     lcd.print("SW1 is H");
  }else{
     lcd.print("SW1 is L");
  }

  // SW 2
  val = i2c_read_byte(I2C_EXPANDER_ADDR, 0x00);
  lcd.setCursor(0, 1);
  if ((val & 0x02) == 0x02)  {
     lcd.print("SW2 is H");
  }
  else {
    lcd.print("SW2 is L");
  }
  delay(1000);
}

//=====================================================================
// I2C control function
//=====================================================================
//-----------------------------------------------
// I2C Write 1 byte to the slave device
//-----------------------------------------------
void i2c_write_byte(int device_address, int reg_address, int write_data){
  Wire.beginTransmission(device_address);
  Wire.write(reg_address);
  Wire.write(write_data);
  Wire.endTransmission();
}

//-----------------------------------------------
// I2C Read 1 byte from the slave device
//-----------------------------------------------
unsigned char i2c_read_byte(int device_address, int reg_address){

  int read_data = 0;

  Wire.beginTransmission(device_address);
  Wire.write(reg_address);
  Wire.endTransmission(false);

  Wire.requestFrom(device_address, 1);
  read_data = Wire.read();

  return read_data;
}
Execution Results
On the LCD the screens are displayed in the following order
- The “Hello” string
- Moving the cursor
- Button input status display
Last modified 06.04.2021