Web Bluetooth IoT
This sample is the same as the one introduced in Basic Kit Getting Started Guide. Let’s read the source code to understand how it works.

Introduction
Leafony is designed to make it easy to develop small, power-saving IoT devices, and each leaf is designed to save power. Since it runs on battery for a long time, it can be placed in various locations to perform fixed-point observations with sensors.
So how can data such as temperature, humidity, and illumination measured by sensors be collected? In general, wireless communication such as Wi-Fi, Bluetooth, and LoRa is used. Leafony has a leaf equipped with Bluetooth, one of the most power-efficient wireless communication standards.
The Basic Kit is a kit that makes it easy to develop long battery-powered IoT sensors using the 4-Sensor Leaf, which is equipped with multiple power-saving sensors, and the BLE Leaf, which is equipped with Bluetooth LE (hereinafter referred to as BLE), a power-saving Bluetooth standard.
So what do we need to do in order to receive the BLE sent by Leafony? There are many different environments for PCs, smartphones, and tablets: PCs running Windows, PCs running MacOS, Android, iPhone, and so on. In order to use Bluetooth in these environments, it is normal to develop in a programming language tailored to each environment. For PC, you can develop using languages such as C and Python, but for Android and iPhone, you need to use Android Studio, Xcode, etc. to create software in yet another programming language.
How can we easily develop something that is used by many people in many different environments? In this sample application, one way to do this is to use a web browser to communicate via Bluetooth and display the data on the screen.
The languages used are HTML and Java Script. A program written in these two languages will work equally well in any environment on a web browser.
Points
- The Web Bluetooth library allows you to write software for Bluetooth connection in a web application.
- If it is a web application, the same source code will work on any device that runs a browser.
- GUIs such as tables and graphs can be easily developed using HTML and CSS.
What to prepare
- Leafony Basic Kit
- Windows1, Mac2, or Linux3 PC (for development)
- Android4, iPhone5, iPad5 smartphone or tablet (does not have to be for testing)
- Google Chrome (Version 70.0.3526.0 or later)
- Arduino IDE
Sample app source code
Please download both in advance.
Leafony Configuration
In this sample, you can try the following leaf configurations.
| Type | Name | Q’ty |
|---|---|---|
| AZ62 | Connector Cover | 1 |
| AI01 | 4-Sensors | 1 |
| AZ01 | USB | 1 |
| AP01 | AVR MCU | 1 |
| AC02 | BLE Sugar | 1 |
| AV01 | CR2032 | 1 |
| - | CR2032 coin cell battery | 1 |
| - | M2*18mm screw | 2 |
Assembly
Let’s assemble leaves as shown in the figure below.

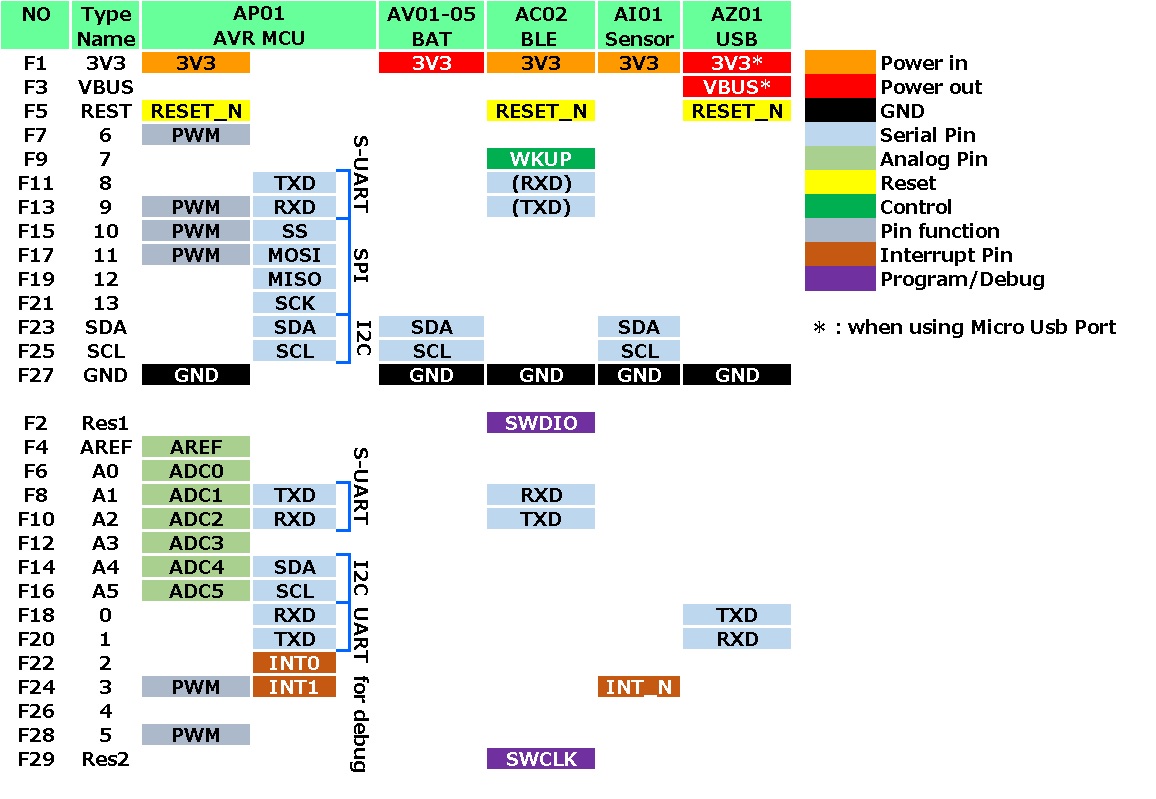
Pin assignment
Refer to the figure below for the pin assignment of each leaf.
Execution method
- Write 4-Sensors_BLE.ino in Arduino IDE.
- Open the downloaded
index.htmlof Web Bluetooth App with Google Chrome.
For details on how to use the web app, refer to the Basic Kit Getting Started Guide.

Sending data
Let’s see how to send and receive data with BLE.
Leafony side
In 4-Sensors_BLE.ino, around lAny data can be sent by changing this text.ine 1020, we generate the text data to be sent via Bluetooth.
Any data can be sent by changing this text.
sendLen = sprintf(sendData, "%04s,%04s,%04s,%04s,%04s,%01s\n", temp, humid, light, tilt, battVolt, pips)
In the above, comma-separated data like <temperature>,<humidity>,<illuminance>,<slope>,<battery voltage>,<dice> is sent.
The following is the part that actually sends this text data. (Around line 1085)
ble112.ble_cmd_gatt_server_send_characteristic_notification( 1, 0x000C, sendLen, (const uint8 *)sendData );
Web app side
On the web app side, the process for receiving data is written in leafony.js.
In line 75 of leafony.js, we specify the function to be called when data is received.
Here, the function handleData() is called.
char.read.addEventListener( 'characteristicvaluechanged', handleData );
The handleData() function is also described in leafony.js.
The data received by the BLE is contained in event.target.value.
Once the values are copied into the variable data, the received data is decoded in utf-8, the newline code (\r\n) is removed, and then the data is made into an array separated by commas ,.
These data are stored in a variable called state with an arbitrary name. (state.temp, state.humid, etc.)
If the data sent by the Leafony side is changed, it can be decoded by modifying the handleData() function.
    /**
     * Characteristicの値が変化した時に呼び出される関数
     * @param {*} event
     */
    function handleData( event ) {
        // 受信したデータの文字コードを変換して、カンマでデータを分けている
        // このサンプルではLeafonyは
        // 温度,湿度,傾き,電池の電圧
        // のようにカンマ区切りのテキストを送信している。
        let data = event.target.value;
        let decoder = new TextDecoder( 'utf-8' );
        data = decoder.decode( data );
        data = data.replace( /\r?\n/g, '' );
        data = data.split( ',' );

        state.devn = deviceName;
        state.unin = uniqueName;
        state.temp = data[0];
        state.humd = data[1];
        state.illm = data[2];
        state.tilt = data[3];
        state.batt = data[4];
        state.dice = data[5];
        // ここで updateTable() が実行されている
        onStateChangeCallback( state );

        // 省略
    }
Receiving data
Web app side
By pressing the “LED+” and “LED-” buttons on the web app screen, you can change the blinking speed of Leafony’s LEDs.
The process for when the buttons are pressed is described in the following part of app.js.
buttonLedPls.addEventListener ( 'click', function () {

    console.log( 'LED Plus Button Clicked' );
    leafony.sendCommand( 'PLS' );

});
leafony.sendCommand( 'string' ); to send an arbitrary string to Leafony.
Leafony side
When Leafony receives a string sent from the web app side, the my_evt_gatt_server_attribute_value() function in 4-Sensors.ino will be called.
The decoded string is copied to a variable named rcv_data and processed according to the content of the string.
void my_evt_gatt_server_attribute_value( const struct ble_msg_gatt_server_attribute_value_evt_t *msg ) {
    uint16 attribute = (uint16)msg -> attribute;
    uint16 offset = 0;
    uint8 value_len = msg -> value.len;

    uint8 value_data[20];
    String rcv_data;
    rcv_data = "";
    for (uint8_t i = 0; i < value_len; i++) {
        rcv_data += (char)(msg -> value.data[i]);
    }

    // 中略

    if( rcv_data.indexOf("SND") == 0 ){
        bBLEsendData = true;
        iToggle = 8;
    } else if( rcv_data.indexOf("STP") == 0 ){
        bBLEsendData = false;
        bLCDchange = true;
        lcd_view_sts = 1;
    } else if(rcv_data.indexOf("PLS") == 0){
      if(iToggle < 16){
        iToggle += 2;
      }
    } else if(rcv_data.indexOf("MNS") == 0){
      if(iToggle > 2){
        iToggle -= 2;
      }
    }
}
You can easily send and receive data by modifying the above sections.
Structure
- Peripheral and Central
- Advertisement
- GATT
- Characteristic
Web app side
It consists of three files: index.html, app.js, and leafony.js.
The index.html is simple enough to place buttons and tables, and load two other javascript files.
app.js contains the main processing, such as what happens when a button is pressed.
leafony.js describes the specific process of connecting to Leafony using Web Bluetooth.
Notes on Web Bluetooth
As of June 2020, Web Bluetooth will need to take the following points into account.
- It does not work with Chrome on iPhone.It is available by using a paid application called WebBLE.
- The development status of Web Bluetooth and supported browsers can be found at implementation-status.md.
Reference
https://qiita.com/s_nkg/items/bdb235388eaeb567b54d